INTRODUCTION:
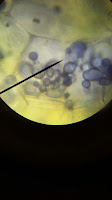
Gram staining is a method of differentiating bacterial species into two large groups: gram positive and gram negative.
OBJECTIVES:
1. Differentiate yogurt bacteria (Streptococcus and Lactobacillus)
2. Relate the staining procedure with the structure of the cells.
MATERIAL:
- Slide
- Tongs
- Cover slip
- Needle
- Gram stain: crystal violet, iodine and safranin
- Decolorize reagenti: ethanol 96%
- Yogurt
- Microscope
PROCEDURE:
1. Fix a piece of yogurt
2. Add crystal violet during 1 minute and 30 seconds
3. Add water
4. Add Lugol during 1 minute
5. Add water
6. Add ethanol
7. Add safranin during 1 minute
8. Add water
Thursday, May 26, 2016
MITOSIS IN AN ONION ROOT
INTRODUCTION:
In this experiment we will see the parts of the mitosi in a onion root.
Parts of the mitosi
MATERIAL:
-Distilled water
-Orceine A and B
-Water
-Onion
- Microscope
- Slide
- Coverslip
-Dropper
-Needles emmanegades
- Watch glass
- Beaker
- Thin tongs
- lighter
- Cellulose paper
PROCEDURE:
1。Put the onion in a beaker with water for a week, because the roots need touch the water
2。When the roots grow up 3cm, cut the final 4 mm and put this in the watch glass with orceine A.
3。Then, you need to put in the heater with the flame of the lighter until
you see vapor
4。 With the tongs take the piece of the root and put in a slide and put the orceine B with the dropper.
5。 Put the coverslip and with a piece of cellulose paper you need to push and turn in the coverslide to extend de cells.
6。Observe with the microscope with 600 increases and you will see the parts of the mitosi.
NANO ENCAPSULATION
MATERIALS:
-Sodium chloride
-Sodium alginate
-Coca-Cola
-Beaker
-Pipet
-Strainer
PROCEDURE:
- We mix the sodium chloride with the sodium alginate, this contain coca-cola.
- Then you will see a gelatinous form that precipitated and you will have the pill.
- And you must take the strainer and the coca-cola inside.
APLICATIONS OF NANOENCAPSULATION:
1. The first aplication is with the food industry: incorporation food ingredients, enzymes, cells or other materials in small devices.
2. In the second aplication we see the development of new materials, including biomaterials and biocomposites for food, pharmaceutical, biomedical and chemical.
3. And the last you can see the development of new micro and nanoencapsulation systems for the protection of various bioactive ingredients.
Monday, April 25, 2016
BIOTEST
MATERIAL:
-Nanoparticules of gold
-Watch glasses
-Distilled water
-Water with sugar
-NaCl
PROCEDURE:
Firtst we need to know that the nanoparticules of gold change their color when we cahnge the agregation.
We have tree watch glasses
-In the firs watch glasses we put distilled water and gold. But we can't see any reaction.
-In the second watch glasses we put water with sugar and gold. But we can't see any reaction.
-In the third watch glasses we put NaCl and gold. In this reaction the nanoparticules change the color(blue)
Nanoparticules of gold
QUESTION:
Why change the color when we add NaCl?
Because the agregation of nanoparticules change.
BIOTOXICITAT
MATERIAL:
-Silver nanoparticles
-Sugar and yest
-Destilled water
-Hot place
-Ballon
-Spatula
-Pipet
PROCEDURE:
1. We take the nanoparticules of silver. The silver nanoparticules are toxics and damage the live cells.
2. We have three elermeyers: in the firt elermeyer we put sugar, yest and water. In the second elermeyer we put sugar, yest, water and 1ml of silver. And in the third elermeyer we put water, sugar, yest and 3ml of silver.
3.Then we put the elermeyers in the hot place with one ballon clousen the elermeyer.
CONCLUSION:
We see that the experiment procedure CO2 and we see that the ballon inflate,
QUESTION:
Why not inflate the last ballon?
Because the nanoparticules of silver kill the yest.
NANOESCALA
MATERIAL:
-2 beaker
-2 efervecent tablet
-Morter
PROCEDURE:
In the first beaker we put the efervecent table with water. The efervecent table dissolves slowly because is very big and thick.
In the second beaker we put the efervecent table with water,but in this beaker the efervencent table is crushed. For this it dissolves more quickly.
QUESTION:
Why the crushed table was faster?
Because thre are more surface
-2 beaker
-2 efervecent tablet
-Morter
PROCEDURE:
In the first beaker we put the efervecent table with water. The efervecent table dissolves slowly because is very big and thick.
In the second beaker we put the efervecent table with water,but in this beaker the efervencent table is crushed. For this it dissolves more quickly.
Why the crushed table was faster?
Because thre are more surface
Monday, March 14, 2016
LEAF PIGMENTS CHROMATOGRAPHY:
OBJECTIVE:
We are going to do a paper chromatography.
MATERIAL:
-Mortal and pestle
-Scissor
-Funnel
-Graduated cylinder
-Beaker (250ml)
-Sand
-Ethanol
-Spinacks
-CaCO3
-Cellulose paper
PROCEDURE:
-Take ten spinacks
-Cut it in small pieces in the mortal (Not take the nerve)
-Put the sand in the mortal with a spatula
-Add CaCo3 in the mortal with a spatula
-Add 50ml the ethanol in the mortal
-Then you need to grind
-Filter this in a graduated cylinder with cellulose paper and put all in the beaker
-Create a small paper and put inside the beacker
-Create other small paper fold it and put into other beaker
QUESTIONS:
1.Why do we add sand?
For brake the cell and cloroplast.
2.Why do we add calcium carbonate?
For avoid the pigmnets degradesion.
3.Which is the colour of every pigmnets?
Clorofila green, xantofil yellow and carotenoide orange.
4.What adaptative purpose do differents colored pigmnets serve for a plant?
Because the light have diferents wave lenghts and the pigmnets take this diferents waves lenghts.
5.Why do they separate on the cellulose paper?
Because not all the pigmnets have the same solubility.
CHROMOPLAST AND AMILOPLAST:
INTRODUCTION:
The chromoplast store cloroplast. And the amiloplast is chain of milo.
PROCEDURE WITH TOMATO:
-Take a squash of tomato
-Put the squash in a cover slip
-With a 2cm paper tight the squash
-Dry the squash of tomato
-Observe the cell and try to see the pigments
PROCEDURE WITH POTATO:
-Cut the potato and take a white liquid
-Put this in a cover slip
-Dry the white liquid
-Put lugol and wait 3minutes
-Throw the lugol with distilled water
-Observe the sample
OBSERVATIONS:
The cells are transparents But the pigmnets create the colour red of the potato. This pigmnets are inside the cloroplast.
Tuesday, February 23, 2016
PROTEIN DENATURATION
INTRODUCTION:
Denaturation is a process in which proteins or nucleic acids lose the quaternary, tertiary and secondary structure that is present in their native state.
OBJECTIVE:
1.Study de relation between the structure and the function of proteins
2.Understand how temperature, pH and salinity affect to the protein structure.
MATERIALS:
-2x250mL beaker
-4 test tube
-10mL Pipet
-Knife
-Glass marking pen
-Potato
-Distilled water
-Hydrogen Peroxide
-NaCl
-HCl
CATALASE ACTIVITY:
Catalase is a common enzyme found in nerly all-living organisms exposed to oxygen. It catalyzes the composition of hydrogen peroxide to water and oxygen. It is a very important enzyme in protecting the cell from oxidative damage and preventing the accumulation of hydrogen peroxide.
In this experiment we are going to test the catalase activity in different environment situations. We are going to mesure the rate of enzyme activity under various conditions, such as different pH values and temperature. We will mesure catalase activity by observing the oxygen gas bubble when water is destroyed.
Prepare 30mL of water 10% in beaker with a pipet
Prepare 30mL of HCl 10% in beaker
Prepare 30mL of NaCl 50% in beaker
Peel a fresh potato tuber and cut the tissue in five cubes of 1cm3
Weight them and equale the mass
Label the test tubes
Immerse 10 minutes your piece of potato inside HCl beaker
Immerse 10 minutes another piece of potato inside NaOH beaker
Boil another piece of potato
With a mortal, mash up the third piece of potato
Prepare 5 test tubes as indicated below
Add 5mL of watwe 10% in each test tube
The independent variable is the test tube and the dependent variable is the bubble weight. In this photo we can see this:
QUESTIONS:
Denaturation is a process in which proteins or nucleic acids lose the quaternary, tertiary and secondary structure that is present in their native state.
OBJECTIVE:
1.Study de relation between the structure and the function of proteins
2.Understand how temperature, pH and salinity affect to the protein structure.
MATERIALS:
-2x250mL beaker
-4 test tube
-10mL Pipet
-Knife
-Glass marking pen
-Potato
-Distilled water
-Hydrogen Peroxide
-NaCl
-HCl
CATALASE ACTIVITY:
Catalase is a common enzyme found in nerly all-living organisms exposed to oxygen. It catalyzes the composition of hydrogen peroxide to water and oxygen. It is a very important enzyme in protecting the cell from oxidative damage and preventing the accumulation of hydrogen peroxide.
In this experiment we are going to test the catalase activity in different environment situations. We are going to mesure the rate of enzyme activity under various conditions, such as different pH values and temperature. We will mesure catalase activity by observing the oxygen gas bubble when water is destroyed.
Prepare 30mL of water 10% in beaker with a pipet
Prepare 30mL of HCl 10% in beaker
Prepare 30mL of NaCl 50% in beaker
Peel a fresh potato tuber and cut the tissue in five cubes of 1cm3
Weight them and equale the mass
Label the test tubes
Immerse 10 minutes your piece of potato inside HCl beaker
Immerse 10 minutes another piece of potato inside NaOH beaker
Boil another piece of potato
With a mortal, mash up the third piece of potato
Prepare 5 test tubes as indicated below
Add 5mL of watwe 10% in each test tube
TUBE
|
TREATMENT
|
1
|
Raw potato
|
2
|
Boiled potato
|
3
|
Potato with HCl treatment
|
4
|
Potato with NaCl treatment
|
5
|
Mashed up potato
|
The independent variable is the test tube and the dependent variable is the bubble weight. In this photo we can see this:
QUESTIONS:
1. How did the temperature of the potato affect the activity of catalase?
Temperature denaturate the catalase.
2. How did the change of the pH of the potato affect the activity of catalase?
The change of the Ph denaturate the catalase.
3. In wich potato treatment was catalase the most active? Why do you think this was?
In the mashed potato, because we had broken the cells.
4. An experiment was performed to test the effect of temperature and pH on the activity of Enzyme X. The following data was collected during the experiment:
a) What is the optimum pH of enzyme X? 8 (maximum activity)
b) What is the optimum temperature of enzyme X? 20 (maximum activity)
c) Why do you think enzyme X has low activity at a pH of 10? Because has been denatured
DNA EXTRACTION
INTRODUCTION:
Desoxyribonucleics acid is a nucleic acid that encodes the genetic instructions udes in the development and functioning of all know living organisms and many viruses.
-10mL graduated cylinder
-Small funnel
-Glass stirring rod
-10mL Pipet
-Knife
-Safety goggles
-Cheesecloth
-Kiwi
-Banana
-Pineapple juice
-Distilled water
-90% ethanol ice-cold
-7mL DNA buffer
-50 mL dish soap
-15g NaCl
-900mL tap water
PROCEDURE:
Put the ethanol in the freezer-you will need it really cold later!
Prepare the buffer in a 0'5L beaker:
-450mL of a tap water
-25mL of dish soap
-7g NaCl. Stir the mixture.
1.Peel the kiwi and chop it to small piece. Place the pieces of the kiwi in one 600mL beaker and smash with a fork until it becomes a juice puree.
2.Add 8mL of buffer to the beaker.
3.Mash the kiwi puree carefully for 3 minutes without creating many bubbles.
4.Filter the mixture: put funnel on top of the gradduated cylinder. Place the cheesecloth on top of the funnel.
5.Add beaker contain carefully on top of the cheesecloth to fill the graduated cylinder. The juice will drain through the cheesecloth but the chucks of kiwi will not pass throught into the graduated cylinder.
6.Add the pineapple juice to the green juice. This step will help us to obtain a purer solution of DNA. Pineapple juice contains an ezyme that breaks down proteins.
7.Tilt the graduated cylinder and pour in an equal amount of ethanol with an automatic pipet. Put the ehanol through the sides of the graduated cylinder very carrefully. You will need about equal volumes of DNA solutions to ethanol.
8.Place the graduated cylinder so that it is eye level. Using the stirring rod, collect DNA at the boundary of ethanol and kiwi juice. Don't stir the kiwi juice, only stir in the above ethanol layer.
9.The DNAprecipitate looks like long . white and thin fibers.
10.Gently remove the stirring rod and examine what the DNA looks like.
(Roger's photo blog)
QUESTIONS:
1.Like a gelatine, colour white.
2.To brake the cells. It is located in the cell wall
3.We add salt to brake the cells and soap to clean the proteins.
4.It is a good methond to catch it bacause the DNA goes to ethanol.
Desoxyribonucleics acid is a nucleic acid that encodes the genetic instructions udes in the development and functioning of all know living organisms and many viruses.
MATERIALS:
-1L Efety gogglesrlenmeyer flisk
-100mL beaker-10mL graduated cylinder
-Small funnel
-Glass stirring rod
-10mL Pipet
-Knife
-Safety goggles
-Cheesecloth
-Kiwi
-Banana
-Pineapple juice
-Distilled water
-90% ethanol ice-cold
-7mL DNA buffer
-50 mL dish soap
-15g NaCl
-900mL tap water
PROCEDURE:
Put the ethanol in the freezer-you will need it really cold later!
Prepare the buffer in a 0'5L beaker:
-450mL of a tap water
-25mL of dish soap
-7g NaCl. Stir the mixture.
1.Peel the kiwi and chop it to small piece. Place the pieces of the kiwi in one 600mL beaker and smash with a fork until it becomes a juice puree.
2.Add 8mL of buffer to the beaker.
3.Mash the kiwi puree carefully for 3 minutes without creating many bubbles.
4.Filter the mixture: put funnel on top of the gradduated cylinder. Place the cheesecloth on top of the funnel.
5.Add beaker contain carefully on top of the cheesecloth to fill the graduated cylinder. The juice will drain through the cheesecloth but the chucks of kiwi will not pass throught into the graduated cylinder.
6.Add the pineapple juice to the green juice. This step will help us to obtain a purer solution of DNA. Pineapple juice contains an ezyme that breaks down proteins.
7.Tilt the graduated cylinder and pour in an equal amount of ethanol with an automatic pipet. Put the ehanol through the sides of the graduated cylinder very carrefully. You will need about equal volumes of DNA solutions to ethanol.
8.Place the graduated cylinder so that it is eye level. Using the stirring rod, collect DNA at the boundary of ethanol and kiwi juice. Don't stir the kiwi juice, only stir in the above ethanol layer.
9.The DNAprecipitate looks like long . white and thin fibers.
10.Gently remove the stirring rod and examine what the DNA looks like.
(Roger's photo blog)
QUESTIONS:
1.Like a gelatine, colour white.
2.To brake the cells. It is located in the cell wall
3.We add salt to brake the cells and soap to clean the proteins.
4.It is a good methond to catch it bacause the DNA goes to ethanol.
Determinació: llet, caseïna, altres proteïnes, midó i glúcids reductors i presència de lípids
DETERMINACIÓ DE LA COMPOSICIÓ DE LA LLET:
La llet conté vitamines (tiamina, riboflavina, àcid pantotènic i vitamines A, D i K), minerals (calci, potassi, sodi, fòsfor i metalls en petites quantitats), proeïnes, glúcids i lípids. Els únics elements importants que no te són ferro i vitamina C.
L'objectiu de la pràtica és identificar tots aquests components.
DETERMINACIÓ DE LA CASEÏNA:
La caseïna és una proteïna conjugada del tipus fosfoproteïna que se separa de la llet per acidificació i forma una massa blanca. Les fosfoproteïnes són un grup de proteïnes que es troben químicament unides a àcid fosfòric, en el cas de la caseïna aquests grups fòsfor es troben units als aminoàcids serina i treonina. La caseïna representa entre 77 i el 82% de les proteïnes presents a la llet. Aquesta proteïna presenta una baixa solubilitat a pH 4,6. En la primera part del experiment aïllareu la caseïna.
1- Afegiu 200ml de llet en un vas de precipitats i escalfeu fins 40 graus aproximadament.
2- Traieu-lo del foc i afegiu gota a gota àcid acètic (1ml d'àcid acètic glacial en 10 ml d'aigua destil.lada) amb un comptagotes. Agiteu amb una vareta de vidre fins que acabi de precipitar tota la caseïna.
DETERMINACIÓ D'ALTRES PROTEÏNES:
La llet conté vitamines (tiamina, riboflavina, àcid pantotènic i vitamines A, D i K), minerals (calci, potassi, sodi, fòsfor i metalls en petites quantitats), proeïnes, glúcids i lípids. Els únics elements importants que no te són ferro i vitamina C.
L'objectiu de la pràtica és identificar tots aquests components.
DETERMINACIÓ DE LA CASEÏNA:
La caseïna és una proteïna conjugada del tipus fosfoproteïna que se separa de la llet per acidificació i forma una massa blanca. Les fosfoproteïnes són un grup de proteïnes que es troben químicament unides a àcid fosfòric, en el cas de la caseïna aquests grups fòsfor es troben units als aminoàcids serina i treonina. La caseïna representa entre 77 i el 82% de les proteïnes presents a la llet. Aquesta proteïna presenta una baixa solubilitat a pH 4,6. En la primera part del experiment aïllareu la caseïna.
1- Afegiu 200ml de llet en un vas de precipitats i escalfeu fins 40 graus aproximadament.
2- Traieu-lo del foc i afegiu gota a gota àcid acètic (1ml d'àcid acètic glacial en 10 ml d'aigua destil.lada) amb un comptagotes. Agiteu amb una vareta de vidre fins que acabi de precipitar tota la caseïna.
3- Separeu la caseïna amb ajuda d'una espàtula i poseu-la en un vidre de rellotge. Poseu-lo a assecar en la placa calenta.
4- Afegir immediatament en el líquid que us ha quedat 4 gr de carbonat de calci en pols. Agiteu al llarg d'uns minuts i guardeu-lo per la següent part. Això és el sèrum de la llet.
5- Quan la caseïna hagi perdut l'aigua calculeu el percentatge de caseïna aïllada sabent que la densitat de la llet és 1,03 g/ml.
100.........X X=13'15
DETERMINACIÓ D'ALTRES PROTEÏNES:
1-Determineu la presència d'altres proteïnes en l'extracte (sèrum) de la pràctica anterior mitjançant la prova de Biuret.
2-Per poder realitzar la pràctica heu d'utilitzar:
- 2ml de sèrum
- 2ml d'hidròxid de sodi
- 5 gotes de sulfat de coure
DETERMINACIÓ DE MIDÓ I GLÚCIDS REDUCTORS:
1-Determineu si la llet conté midó en el producte que heu extret (sèrum) de la pràctica anterior.
2-Determinar la presència de glúcids reductors.
3-Per realitzar la pràctica heu d'utilitzar:
- Petita quantitat de sèrum + lugol
- Sudan III
DETERMINACIÓ DE LA PRESÈNCIA DE LÍPIDS:
1-Determineu la presència de lípids de la llet en un tub d'assaig amb 2ml de llet.
2-Afegiu 1ml d'HCL al 50% al tub d'assaig anterior i escalfeu suaument, anoteu els resultats que observeu.
3-Proveu-lo també amb el sèrum de la llet de la pràctica 1.
4-Utilitzeu 2ml fehling A/B.
(Roger's photo blog)
PROVA
|
PROVA UTILITZADA
|
RESULTAT
|
pH de la llet
|
Tires indicadores de pH
|
7pH
|
Quantitat (gr) caseïna en 100
|
Àcid acètic i desnaturalització
|
13’25%
|
Prèsencia d’altres proteïnes
|
Biuret
|
Positiu
|
Midó
|
Lugol
|
Negatiu
|
Greixos
|
Sudan III
|
Positiu: té greixos
|
Glúcids reductors
|
Fehling
|
Té poder reductor perquè hi ha lactosa
|
RED ONION OSMOSIS
INTRODUCTION:
In this experiment we can see the osmosis process of the red onion.
OBJECTIVES:
We see what happens when we put distilled water and salt water in a piece of red onion.
PROCESURE:
Phase1: Normal Cells/ Dry mount
-Carefully slice away the colored layer of cells from the red onion. This should only be the thin purple layer. Trim to get a piece about this actual size.
-Place the thin, purple onion layer on a dry microscope slide shinny side up- don't put on water or cover slip yet
-Scan the entire onion tissue on low power to find and center the most purple area and focus. Set the microscope to medium power and focus the view.
-Take a picture.
Phase2: Salt water environment/ Wet mount
Now that you have observed the layer of normal cells which are the subject of this lab, make a wet mount using 2 or 3 drops of salt water solution on the onion tissue then install cover slip.
-Watch the cells for epproximately 2-3minutes or longer as you again survey the entire onion tissue on low power. You should see changes within many of the cells initially near the perimeter of the onion tissue. As time passes all or most of the cells should become affected by the salt water. Find some cells that have noticeably been affected and observe them under medium power.
Phase3: Distilled water environment/ Wet mount
-After you have colored the diagram correctly above, you need to prepare for phase 3 of this lab by putting the entire salt water wet mount in the dish of tap water to rinse off the salt water from the slide, cover slip ADN onion tissue layer. Dry the slide and cover-slip then gently dab the onion tissue dry.
-Make a wet mount of the onion tissue you just rinsed using 2 or 3 drops of distilled water on the onion tissue then install cover slip. Watch the cells for approximately 2-3 minutes or longer as you again survey the entire onion tissue on low power. You should see changes within many of the cells initially near the perimeter of the onion tissue. As the time passes all or most of the cells should become affected by the distilled water. Find some cells that have noticeably been affected by the distilled water and observe them under medium power.
QUESTIONS:
1.When the salt solution was added to the onion cells, where was the greater concentration (most pure) of water? How do know this?
The greater concentration where inside, because outside is the salt solution.
2.In the winter, grass often dies near the roads that have been covered in salt to remove the ice. Using what you have learned in this experiment, what do you think is the reason the grass dies?
The cells leaft water.
3.Which kind of transport does water follow across the membrane?
The passive transport.
Thursday, February 11, 2016
ANIMALS CELLS vs PLANTS CELLS
MATERIALS:
-Toothpick
-2 slides
-2 covers slips
-Distilled water
-Methylene blue
-Iodine
-Onion
-Glycerine
OBJECTIVES:
1.Identify the major components of cells.
2.Differetiale between animal and plant cells.
3.Mesure dimensions of the entire cell and the nucleus
PROCEDURE:
Plant cell observation
1.Pour some distilled water into a watch glass
2.Peel off the leaf from half a piece of onion and using forceps, pull out a piece of transperent onion peel (epidermis) from the leaf.
3.Put the epiderms in the watch glass containing distilled water.
4.Take a few drops of iodine solution in a dropper and transfer into another watch glass.
5.Using a brush, transfer the peel into the watch glass containing the dye. Let this remain in the safranin solution for 30 seconds, so that the peel is stained.
6.Take the peel from the iodine solution and place it in the watch glass containing distilled water.
7.Take a few drops of glycerine in a dropper and pour 2-3 drops at the center of a dry glass slide
8.Using the brush, place the peel into the slide containing glycerine.
9.Take a cover slip and place it gently on the peel with the aid of a needle.
10.Remove the extra glycerine using cellulose paper.
11.View it in the microscope.
HOW TO USE A MISCROSCOPE
There are diferents types of microscope:
-Light microscope: is the microscope that you have in school. The common magnifications are: 440X, 60X, 100X.
-Electron microscope: allow scientist to view a universe too small to be seen with a light microscope. Electron microscope don't use light, they use electrons. Threre are two types:
·Scanning electrons microscope: they scan surface.
·Transmission electron microscope: the electrons are passed throught very thin samples.
Parts of the microscope: ocular lens, arm, body tube, light, base, diaphragm, objectives, revolving nosepiece, stage clips, coarse adjustment knob, stage and fine adjustment know.
The magnifications:
|
Magnification
|
Ocular lens
|
TOTAL: magnifications
|
SCANNING
|
4
|
15
|
60
|
LOW POWER
|
10
|
15
|
150
|
HIGH POWER
|
60
|
15
|
900
|
Subscribe to:
Posts (Atom)